

Build an Interactive Voice Response (IVR) application with Africa's Talking, Flask, Docker and Heroku


Introduction
This demo was written and shared with members of the Africa's Talking Freelance Developer sessions. If you are interested in joining us follow the links at the bottom of this article
Welcome back! This is a brand new series on creating amazing experiences with just phone calls. No fancy UI. No React. No Angular. Just a voice call. It may seem super simplistic but in reality, everyone makes calls. In light of this, is it possible to create apps that run on phone calls? Yes! That's what we'll be doing today.
We'll be using Flask, a python micro-framework, and deploying our app on Heroku. We don't have a database as of now but in a future series we'll be saving the data from user responses so stay tuned in for that.
What the app will do
We'll be building a simple guessing game that allows peeps to guess how old Africa's Talking is! This is the current user flow:
- A user will call our number and listen to the instructions
- They will dial in their response on the in-call dial pad
- The app will direct them on whether they have chosen the right answer or not
There are some challenges with the app, we aren't able to keep a user in a loop until they get the right answer but we'll cover this in the next series as we look at slightly mode advanced techniques.
Getting Started
To get your phone call set up, we are going to be using the Africa's Talking platform. Africa's Talking provides APIs that tap into telco infrastructure and makes it easier for developers across Africa to integrate services such as SMS, Voice, USSD, Payments and Airtime. There's also a brand new IoT platform that you could checkout too.
To get started, what you need is a programmable number. Africa's Talking provides these numbers at a cost however, for this tutorial, you can get a number for free. All you have to do is tell us what idea you would like to build on the Voice platform and we'll get you a number free of charge! Fill out this form to share your ideas.
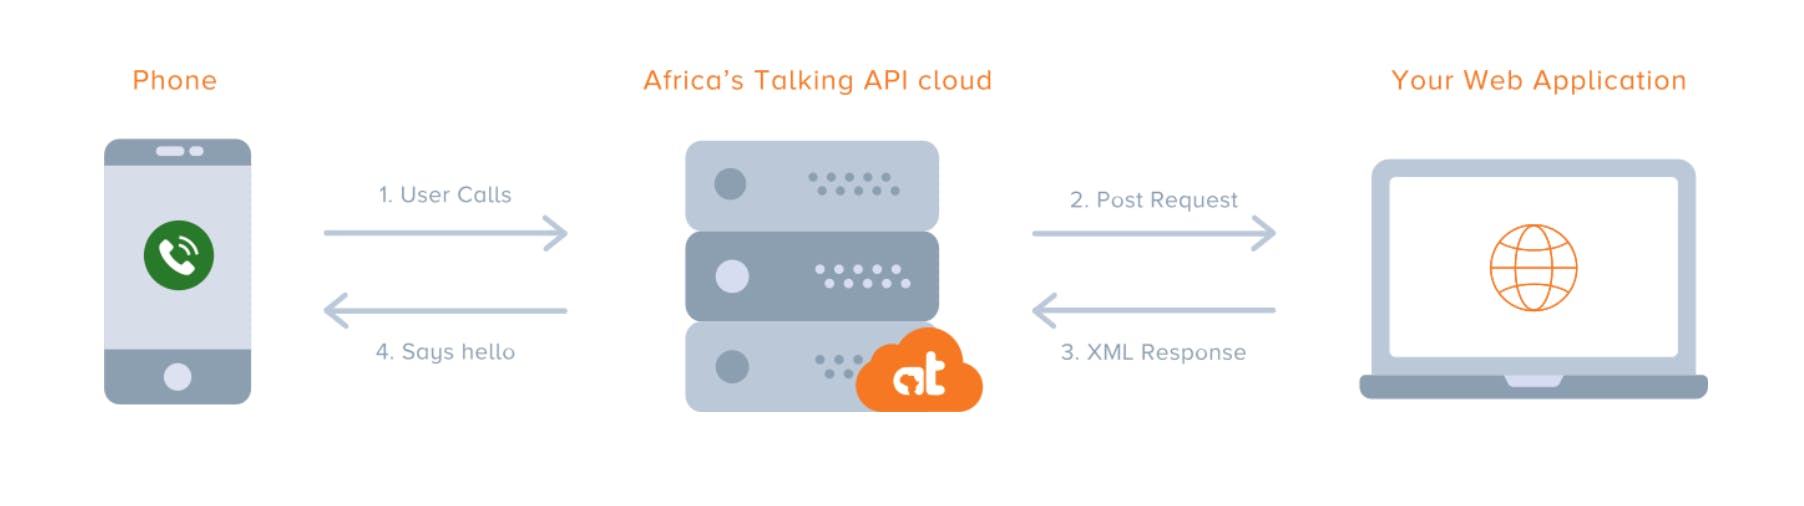
How the Africa's Talking Voice API works
The platform provides a pretty simple approach to building our Interactive Voice Application through a REST API. Here's a simple diagram showing how it works:
Project Setup
To see the API in action we need to build out our app. I'll explain where we'll be working with the API directly as we go along. Let's get this!
Make your project directory in your folder of choice with the following commands:
mkdir voice-python
cd voice-python
Next up, since we're writing python, we should get our python virtual environment set up. We'll do so with the following commands:
pip3 install virtualenv
virtualenv venv
source ./venv/bin/activate
Once done, we can start actually writing some code. Fire up your text editor of choice. I go for VS Code but Atom with Kite integration is really awesome for Python development.
Create a file called app.py in your project's root directory. This is where most of our code will live. In a real-world scenario we may have way more files and modules but one file makes it easier to write this article 😂
Right now, all we need is the Flask micro-framework as well as the Flask API module to help us build our server. Flask is designed to make lightweight servers and serves perfectly for this and Flask API just gives us some cool functionality since we're basically building an API. Lets get it into our project:
pip3 install flask
pip3 install Flask-API
Having Flask and Flask API installed, we can actually write code. Add in the following lines of code:
import os #Allows us to work with local files
from flask import Flask, request #Flask itself
from flask_api import status

app = Flask(__name__)

@app.route("/", ["GET", "POST"])
def index():
    return "Hello, world"

if __name__ == "__main__":
    app.run(host="0.0.0.0", port=os.environ.get("PORT"))
This is a basic Flask scaffold that sets up the first basic route and defines how the application will run including ports and the host. Since we'll be deploying to Docker, we need to set the host to 0.0.0.0 and get our port directly from the OS that will be running our application.
Now, we build out our actual app.
Building XML responses
Since, we're talking about Voice calls, remember that they are still OG tech. Calls have been around for over 100 years now therefore some aspects of it are still shrouded in older communication standards. We use XML to communicate with Voice servers and define certain aspects of our call.
The first methods that we will define will basically be returning XML that will be used to render various voices and add various functionalities.
I haven't found a great XML builder library for Python but don't hesitate to educate all of us in the comments
Let's get to writing our first proper methods! Just below the app=Flask(__name__) line, add the following lines of code:
def entry_phrase():
    response = '<?xml version="1.0"?>'
    response += '<Response>'
    response += '<GetDigits timeout="30" finishOnKey="#" callbackUrl="https://limitless-mountain-80043.herokuapp.com/voice/say">'
    response += '<Play url="http://197.248.0.197:8081/ad846fec309505710462e90a4b48bcb7.mp3">'
    response += '</Play>'
    response += '</GetDigits>'
    response += '<Say>Hi, welcome to the Africas Talking Freelance Developer Program demo app. We have a little question for you. How old is Africas Talking? Dial in your guess and press hash'
    response += '</Response>'

    return response

def success_flow():
    response = '<?xml version="1.0"?>'
    response += '<Response>'
    response += '<Say voice="man">'
    response += 'Awesome! You got it right! Africas Talking has been around for almost a decade!'
    response += '</Say>'
    response += '</Response>'

    return response

def error_flow_too_high():
    response = '<?xml version="1.0"?>'
    response += '<Response>'
    response += '<Say voice="man">'
    response += 'Hi, sorry, thats not quite it. Guess a little lower. Call back to try again. Goodbye.'
    response += '</Say>'
    response += '</Response>'

    return response

def error_flow_too_low():
    response = '<?xml version="1.0"?>'
    response += '<Response>'
    response += '<Say voice="man">'
    response += 'Hi, sorry, thats not quite it. Guess a little higher. Call back to try again. Goodbye.'
    response += '</Say>'
    response += '</Response>'

def error_flow():
    response = '<?xml version="1.0"?>'
    response += '<Response>'
    response += '<Say voice="man">'
    response += 'Hi, sorry, thats not quite it. Something is wrong with the input you provided. Call back to try again. Goodbye.'
    response += '</Say>'
    response += '</Response>'
The code above defines the responses that we will be using to give feedback and instructions to the user. Here's a breakdown of what each of them is doing:
entry_phrase()
This will be the first phrase that the user will hear as the app loads and collects the digits that the user presses (We use# to register user input). It contains instructions on what to do including the asking Africa's Talking's age. The final XML looks something like this:
<?xml version="1.0"?>
<Response>
    <GetDigits timeout="30" finishOnKey="#" callbackUrl="<YOUR_ROOT_URL>/voice/say">
        <Say voice="woman">Hi, welcome to the Africas Talking Freelance Developer Program demo app. We have a little question for you. How old is Africas Talking? Dial in your guess and press hash</Say>
    </GetDigits>
</Response>
We will leave the callback URL element empty for now till we deploy and get our actual route but for testing you can use localhost as
success_flow()
This piece returns XML that will be read out the success message if someone gets the message right.
error_flow_too_high()
This will be read out if the user guesses higher than the actual answer
error_flow_too_low()
This will be read out if the user guesses lower than the actual answer
error_flow()
This will be read out if the input isn't right.
Routes and Logic
The index route
The fun part is here! Actually setting up the routes that we will be using is quite simple. Majority of the work is actually done.
First off, we need to get our root route, "/" playing entry phrase. To do this, change your index route to look like this:
@app.route('/', methods=["GET","POST"])
def index():
    if request.method == "GET":
        return status.HTTP_200_OK
    elif request.method == "POST":
        return entry_phrase()
    else:
        return status.HTTP_400_BAD_REQUEST
This route will do a couple of things for us:
- If the HTTP request we get is a
GETthen we show a 200 status code that means everything is okay (at least, so far) - If the request comes as a
POSTthen we need to actually say something to our user and we returnentry_phrase(). - If we get something that's not a
POSTorGET, we then return an error. OnlyPOSTandGETrequests are allowed on the server.
Once we have this, we are set to handle the first part of the call. Next, we need to direct the user to the appropriate flow once they have provided their input.
Something to note is that at this phase, Africa's Taking's API will send in data to your API with some basic information. Let's breakdown some of the data we'll be receiving:
sessionId- This uniquely identifies the call sessioncallerNumber- This shows you which number is making a calldestinationNumber- This is your Africa's Talking numberdtmfDigits- This is the user input we collect once the user is on the call
We won't use all these data points in this tutorial but checkout the documentation around handling calls for more information on what you can do.
The next route
Next we need to define a new route, <YOUR_URL>/voice/say.
You could name the route whatever suits you best.
This route will check if the user input from the previous route is actually correct. Africa's Talking is 9 years old and that's the value we'll be working with. Add the code below just below the first route:
@app.route('/voice/say', methods=["GET","POST"])
def say_func():
    #Get values from the API
    digits = request.values.get("dtmfDigits")

    if digits == 9:
        return success_flow()
    elif digits > 9:
        return error_flow_too_high()
    elif digits < 9:
        return error_flow()
    else:
        return status.HTTP_400_BAD_REQUEST
Here we implement some simple if statement logic that checks whether user input, which we get from the API, is correct. Here we are only using dtmfDigits but you can save user responses and use that as a way of tracking progress through a custom flow.
Once done, we basically have our voice application ready. Next up, we need to prep it for deployment. You can test your endpoints with Postman or, as I found out today courtesy of Hashnode, Postwoman.
Deploying to Heroku with a Docker container
We'll be using Heroku in this case to deploy our app and best of all we'll be using Docker to containerize our application. To get this done, you'll need a Heroku account and Docker installed on your machine. Once you have your accounts created, install the Heroku CLI and run the following commands:
heroku login
heroku container:login
This logs us into the Heroku CLI and the second command gets our Heroku container registry setup. To confirm that you have Docker properly installed, run:
docker --version
You should see something like Docker version 19.03.4, build 9013bf5. That's what I'm running currently.
Let's get to deploying this awesome app of ours!
Docker and containers
Docker basically ends the "Works on my machine but not in production" problem that so many of us have faced. To make our app a containerized application, we need to create a Dockerfile. To do this, create a new file on your terminal with:
touch Dockerfile
Open the file and add the following lines:
FROM python:3
WORKDIR /code
ENV FLASK_APP app.py
ENV FLASK_RUN_HOST 0.0.0.0
COPY requirements.txt requirements.txt
RUN pip install -r requirements.txt
COPY . .
CMD ["python","app.py"]
This is what is happening:
- The first line creates a container built on the Python 3 Alpine image which a lightweight linux distribution.
- Line 2 sets the working directory as code
- Line 3 sets the default flask application as app.py. This is an environmental variable
- Line 4 sets the default host to 0.0.0.0. This is an environmental variable as well
- We then copy requirements.txt into the container
- We install the packages defined in the requirements.txt file into the container
- We copy all the project files into the container's working directory which is /code.
- We then execute a command python app.py in the container's terminal
We have essentially finished setting up our container. We just need to run a few commands to get up and running to talk to the Africa's Talking service.
Firstly, we will build our container into an image. We ask docker to build this container, tag it voiceapp and use the Dockerfile in this folder.
docker build -t voiceapp .
Secondly, we will create a heroku app.:
heroku create
We now have an project on Heroku that can actually host our application. The Heroku CLI displays it on your terminal. We then set up heroku to take our container for deployment:
heroku container:push web --app <YOUR_HEROKU_APP_NAME>
The container will be published but it's still not live. Next, we make it live with this command:
heroku container:release web --app <YOUR_HEROKU_APP_NAME>
We are now live!!!!
You can view your application on your Heroku dashboard or view logs from the container using:
heroku logs --app <YOUR_HEROKU_APP_NAME> --tail
Remember to add in the link to your
/voice/sayroute as soon as you're live
Connecting to the Africa's Talking Voice Dashboard
Now that our app is live, we head to the Africa's Talking dashboard . If you don't have an account, signing up is super easy. Once its all set up, create an team and an app that you would use. We currently are still working on getting the Voice sandbox out hence we'll be heading to a live account immediately. Head over to the Voice tab and you should be able to see the number assigned to you. You won't need an API key for this product.
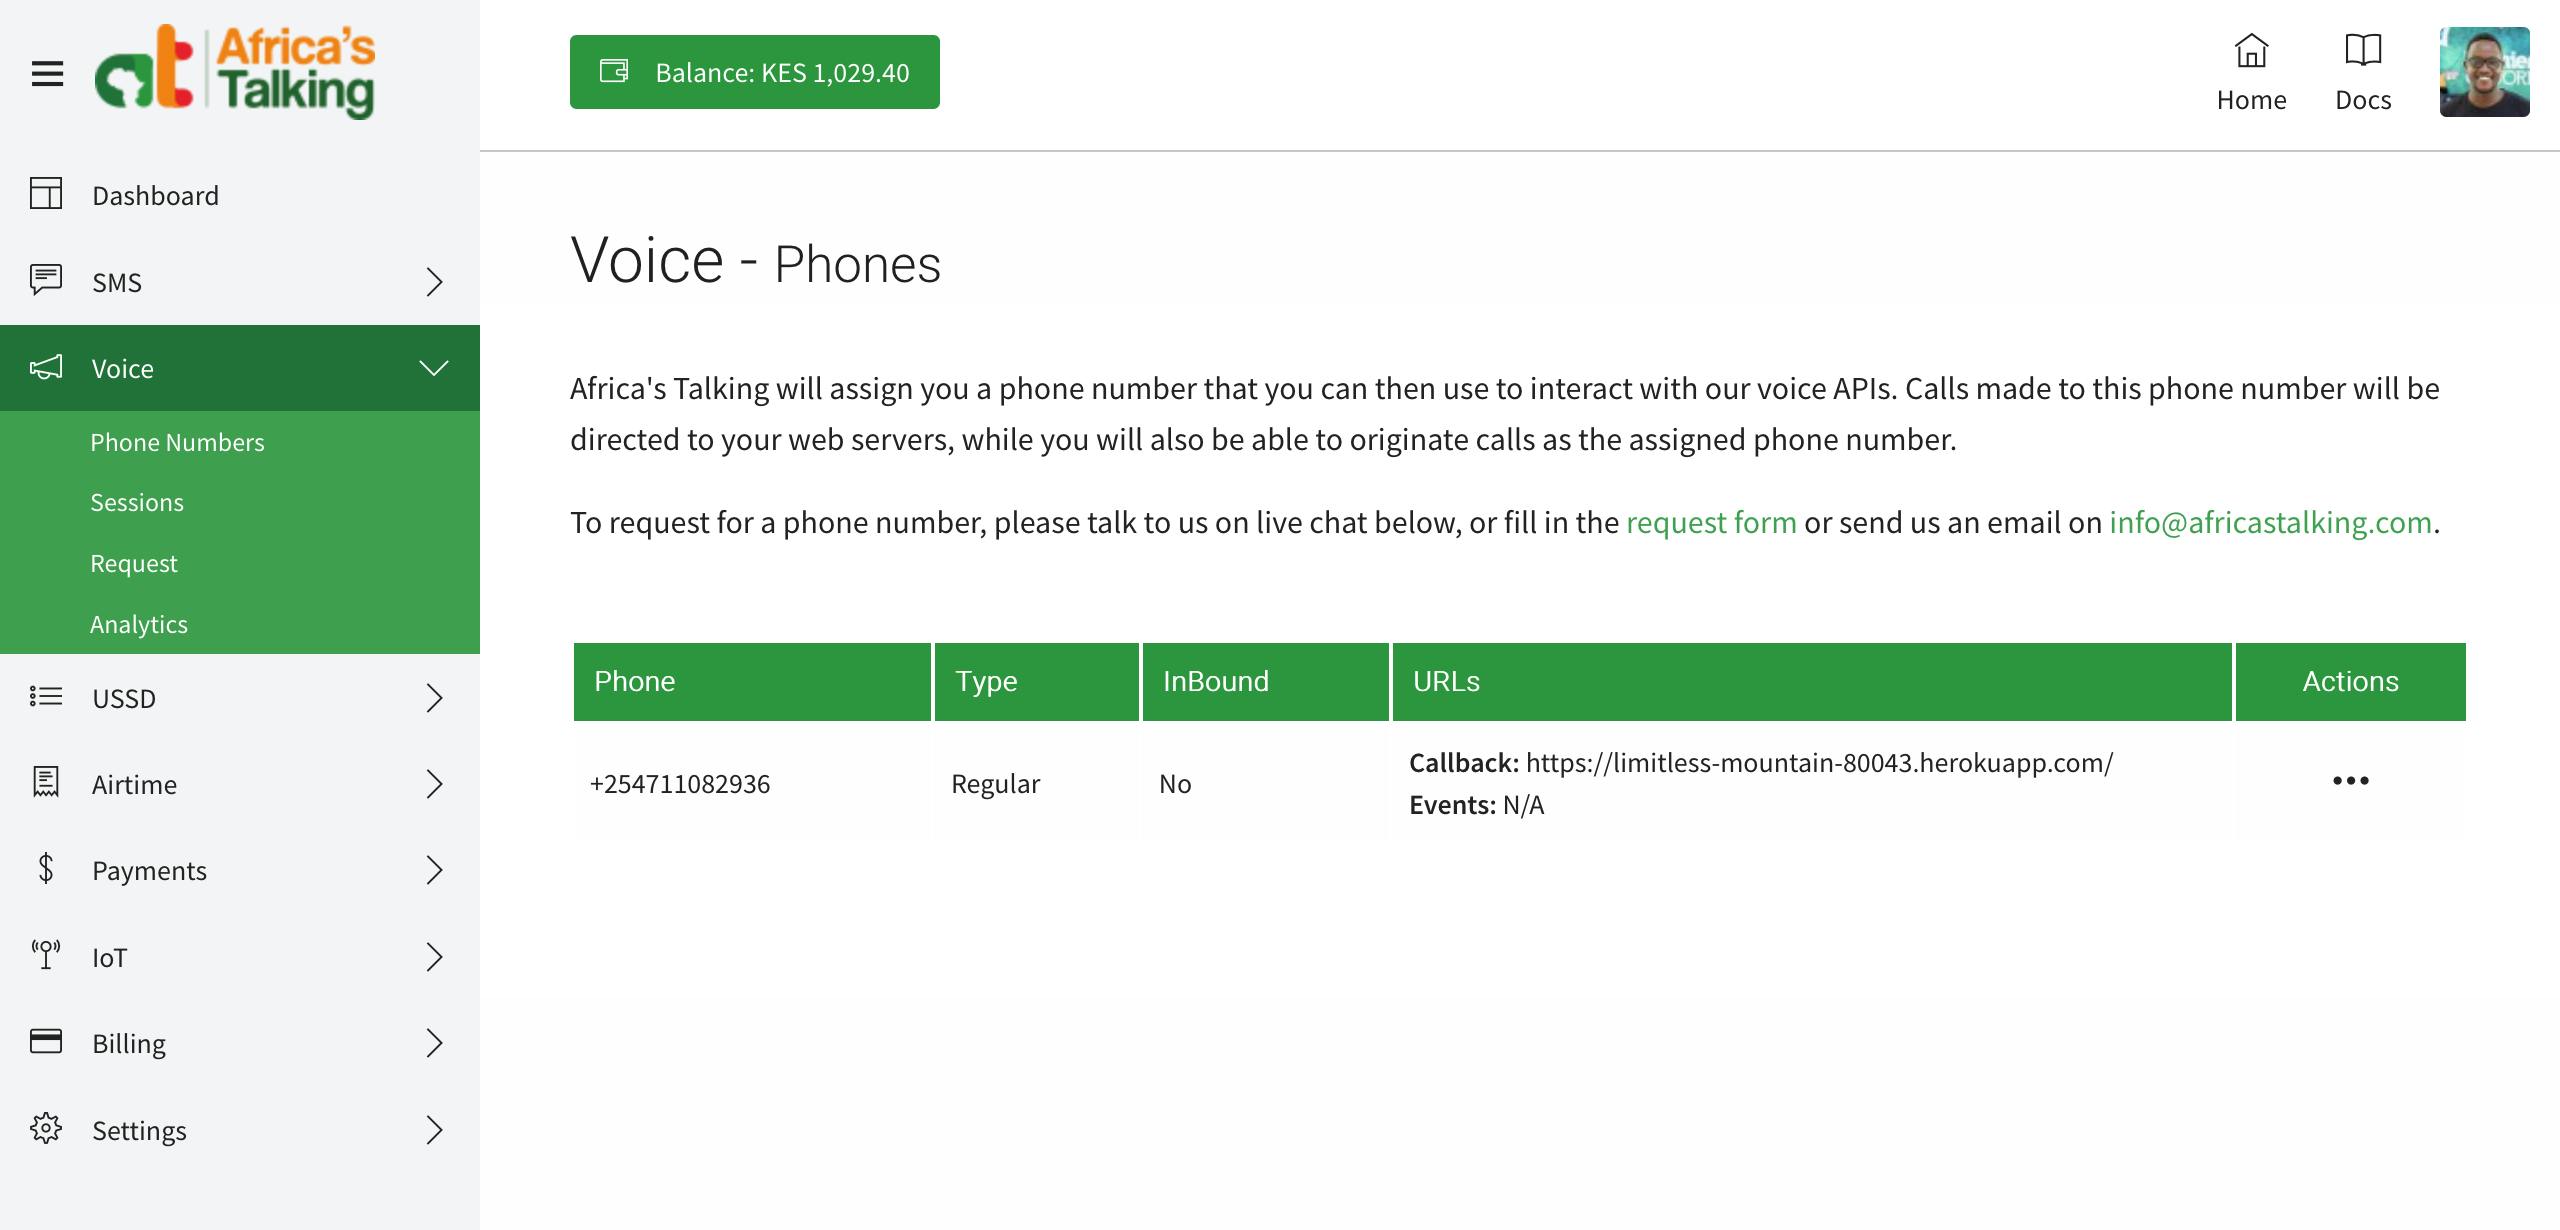
Using the link that we have from Heroku, we set it as the callback URL. And that's it. Give your number a call and enjoy a nice interactive voice response system right there!
Summary
Today, we built an IVR application with some basic functionality. This is a taste of the power of Africa's Talking APIs. I would love to know what awesome apps you can build using this tech and we'll be giving away numbers to developers and start-ups with great ideas on how to use this tech. You can fill out this form and we'll get back to you ASAP! Can't wait to see what awesome software comes out of this.
Next Steps
Next up, we'll be covering a little more advanced techniques around Voice and USSD. If you have cool apps you've built on Africa's Talking, share it in an article and we'll give you a shout-out! (and some sway too!!! 😁)